Features of Astro
First of all, I assume that you have already completed the necessary setup steps (such as installing the Astro extension) to get to this point. If you’ve done that, you’re now ready to start developing Astro files. Let’s get started without further ado.
Creating the Basic Template
Section titled “Creating the Basic Template”First, create a working folder. Then, while inside the folder, right-click and open the terminal, or open the terminal of your editor if it has one (I’m using VS Code as an example), and enter the following commands in the terminal:
npm create astro@latestIt will ask you where you want to create your new project. You can type “dot” (.) here and press Enter to select the folder where the terminal is currently running. If you type something like ”./FolderName,” it will create a folder with the name you specified inside the current working folder. I chose to use a dot:
Where should we create your new project.Next, it will ask you, “How would you like to start your new project?” and provide three options:
Include sample files (recommended)— Use blog template— EmptyHere, we choose the first option. After pressing Enter, you will need to wait for the files to be copied. The speed of this process depends on your computer and internet speed.
After this step, it will ask you, “Do you want to install the dependencies?”
Install dependencies? (recommended)● Yes ○ NoWe choose “Yes” here. (Note: You can choose “No” if you want to install the dependencies later.) Press Enter and wait for the dependencies to be downloaded. If there is an error during the download, it’s okay; you can download the missing files later (I’ll explain this in the continuation of the article).
If you’ve completed this step successfully, it will ask you whether you want to use TypeScript. For now, we choose “No.” (Note: You can enable TypeScript later if you wish.)
Do you plan to write TypeScript?○ Yes ● NoIn the next step, it will ask if you want to create a GitHub repo. If you want to create a GitHub repo, you can choose “Yes.” I chose “No.”
Do you want to create a GitHub repo?○ Yes ● NoIf you encountered an error while installing dependencies, you can run the following command in the terminal:
npm installNow that we’ve completed all the steps, we can start our project. You can start the project by typing the following code:
npm run devOnce you’ve started the project, you will see the following lines on the screen:
dev> astro dev
   astro  v2.5.5 started in 162ms
  ┃ Local    http://localhost:3000/  ┃ Network  use --host to expose
Congratulations! You have successfully created your first Astro project. You can now access your project at http://localhost:3000/.
Note: If another application is running on port 3000 or if port 3001 is in use, it will run on port 3002. Be sure to check the terminal after running the program!
When you access this address, you will likely see a page similar to the one below:
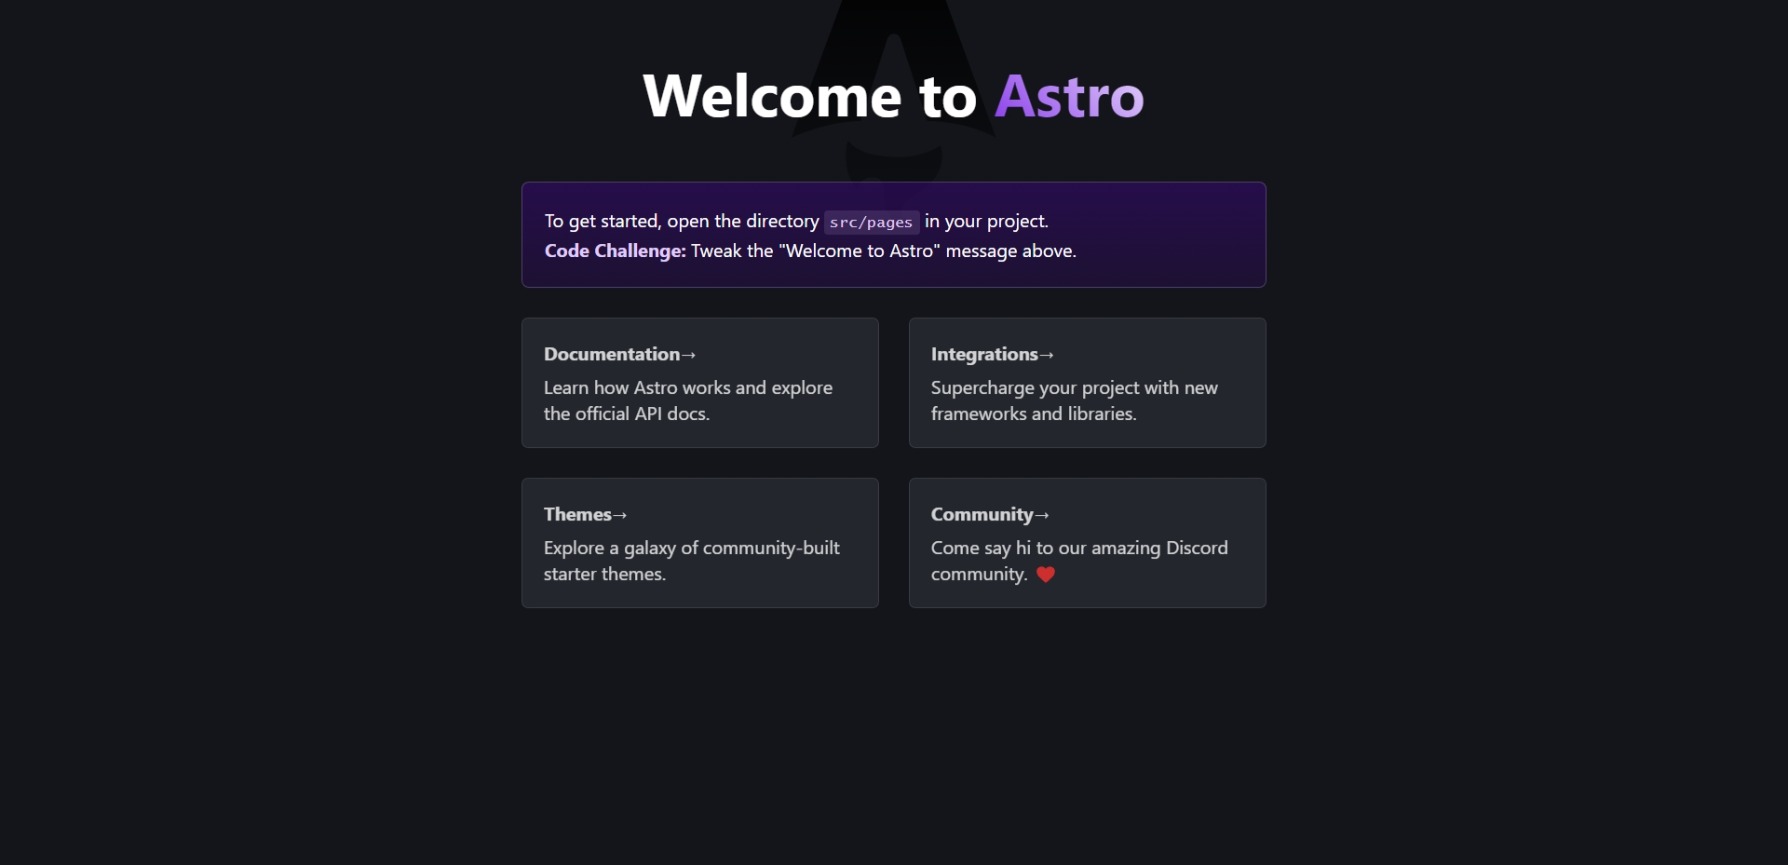
In Astro, when you create a project, open the src/pages/index.astro file. This file is your main page. When you open this file, you will see the following code:
---import Layout from '../layouts/Layout.astro';import Card from '../components/Card.astro';---
<Layout title="Welcome to Astro.">    <main>        <h1>Welcome to <span class="text-gradient">Astro</span></h1>        <p class="instructions">            To get started, open the directory <code>src/pages</code> in your project.<br />            <strong>Code Challenge:</strong> Tweak the "Welcome to Astro" message above.        </p>        <ul role="list" class="link-card-grid">            <Card                href="https://docs.astro.build/"                title="Documentation"                body="Learn how Astro works and explore the official API docs."            />            <Card                href="https://astro.build/integrations/"                title="Integrations"                body="Supercharge your project with new frameworks and libraries."            />            <Card                href="https://astro.build/themes/"                title="Themes"                body="Explore a galaxy of community-built starter themes."            />            <Card                href="https://astro.build/chat/"                title="Community"                body="Come say hi to our amazing Discord community. ❤️"            />        </ul>    </main></Layout>
Now, let’s examine this code. Astro files have a structure, and this file gives you an idea of how Astro files are structured. The code between the three dashes --- is evaluated on the server-side. In this file, imports like Layout and Card are brought in between these dashes. What’s the purpose of this? It’s to avoid repeating code and save time by reusing it.
You might wonder why we write HTML code within the <Layout> tags in this file. Let me explain: In the src/layouts/Layout.astro file, which is located in the Layout folder, you will see a <slot /> tag. The purpose of this tag is to place the code from src/pages/index.astro inside the <slot /> tag of src/layouts/Layout.astro. This way, the code in src/layouts/Layout.astro combines with the code in src/pages/index.astro to create a single page. As a result, we separate the code in src/layouts/Layout.astro from the code in src/pages/index.astro, creating a more organized code structure.
Modular File Structure
Section titled “Modular File Structure”With a modular file structure, you can write your code more neatly and readably. It also allows you to reuse your code. For example, the code in src/components/Card.astro can be used in src/pages/index.astro, eliminating the need to rewrite the code. This saves you time.
For example:
<ul role="list" class="link-card-grid"><Cardhref="https://docs.astro.build/"title="Documentation"body="Learn how Astro works and explore the official API docs."/><Cardhref="https://astro.build/integrations/"title="Integrations"body="Supercharge your project with new frameworks and libraries."/><Cardhref="https://astro.build/themes/"title="Themes"body="Explore a galaxy of community-built starter themes."/><Cardhref="https://astro.build/chat/"title="Community"body="Come say hi to our amazing Discord community. ❤️"/></ul>This code in index.astro eliminates the need to repeat code.
Styles
Section titled “Styles”Now, let’s look at how CSS is used in Astro files.
In Astro files, you can define CSS in two different ways: globally and scoped. Global CSS can be used by other Astro files, while scoped CSS is only used within the current Astro file.
Here’s an example that demonstrates both global and scoped styles:
<style is:global>main {    margin: auto;    padding: 1.5rem;    max-width: 60ch;}h1 {    font-size: 3rem;    font-weight: 800;    margin: 0;}
</style><style scoped>main { margin: auto; padding: 1.5rem; max-width: 60ch;}h1 { font-size: 3rem; font-weight: 800; margin: 0;}
</style>Constants
Section titled “Constants”Now, let’s look at how constants are used in Astro files.
In Astro, you define constants between the three dashes --- at the top of Astro files. Here’s an example:
---const title = "AstroJS' i Seviyorum ❤️";---<!DOCTYPE html><html lang="en"><head>    <meta charset="UTF-8">    <meta name="viewport" content="width=device-width, initial-scale=1.0">    <title>{title}</title></head><body>
</body></html>
In this code block, we defined a constant title and assigned it a string value. Then, we used <title>{title}</title> within the <title> tag to dynamically set the title of the page. If your project is running now and you’ve organized your code like this, you can see that the browser tab title changes accordingly.
However, don’t think that only string values can be defined as constants. You can define numeric values or arrays as well:
---const title = "AstroJS' i Seviyorum ❤️";const sayi = 5;const dizi = [1, 2, 3, 4, 5];---
<!DOCTYPE html><html lang="en">    <head>        <meta charset="UTF-8" />        <meta name="viewport" content="width=device-width, initial-scale=1.0" />        <title>{title}</title>    </head>    <body>        <h1>{sayi}</h1>        <h2>{dizi}</h2>    </body></html>
Map Loop
Section titled “Map Loop”Now, let’s take a look at how the map loop works in Astro.
Let’s start by defining two arrays between the three dashes ---:
---const dizi1 = [1, 2, 3, 4, 5];const dizi2 = ["a", "b", "c", "d", "e"];---Then, in the content of our page, we can use these arrays to render their items:
{dizi1.map((item) => (<p>{item}</p>))}{dizi2.map((item) => (<p>{item}</p>))}
Notice that I used the map function within curly braces {}. In Astro files, you can write certain JavaScript functions within curly braces.
In AstroJS, you can use props to pass data from one Astro file to another.
For example, let’s create a component in the src/components/Baslik.astro file and pass data from it to the src/pages/index.astro file.
Here’s the content of the Baslik.astro file:
---interface Prop{ başlık: string;}const {başlık} = Astro.props;---<h1>{başlık}</h1>Now, let’s look at the content of the index.astro file:
---import Baslik from "../components/Baslik.astro"---<!DOCTYPE html><html lang="en"> <head> <meta charset="UTF-8" /> <meta name="viewport" content="width=device-width, initial-scale=1.0" /> </head> <body> <Baslik başlık="Anasayfa"/> </body></html>
In this code, we first import the Baslik component from the src/components/Baslik.astro file. Then, we use it as <Baslik title="Homepage"/> within the body of the index.astro file. You can pass different objects, such as text, numbers, or arrays, by modifying these codes.
You can also pass objects to other files.
Conditional Rendering (if-else)
Section titled “Conditional Rendering (if-else)”In this section, I’ll show you how to use conditional expressions in Astro files.
First, open your index.astro file and remove all the content. Then, add the following code:
---const {sayi=123} = Astro.props;---{()=>{if(sayi){ return <p>{sayi}</p>}else{ return <p>sayi yok</p>}}}In this code, we defined const {number=123} = Astro.props;. This code sets the default value of number to 123. Since we provided a value for number, the if block will execute and display 123. However, if we hadn’t provided a value for number, the else block would have executed and displayed “No number.”
Map Loop
Section titled “Map Loop”Now, let’s take a look at how the map loop is used:
Add the following code to your index.astro file:
---const {sayi=[[1,2,3],[2,3,4]]} = Astro.props;---{ sayi.map((item,index)=>{ return <div>{item}</div> })}In this code, we created an array numbers that contains sub-arrays. We then used a map loop to iterate through the sub-arrays and display them on the page.