AstroJS - Working with other frameworks
In this section, we will discuss another feature of AstroJS, which is the ability to work seamlessly with other frameworks.
Vue.js
Section titled “Vue.js”For instance, let’s say you are familiar with the Vue.js framework, or you found an application written in Vue.js on the internet that you’d like to integrate into your AstroJS project. In this section, we’ll show you how to do that.
First, place the Vue.js file you’ve written or found from the internet into the src/components/ directory.
Now, you need to install AstroJS’s Vue.js plugin. Open your terminal:
npx astro add vue -yEnter the command above and press Enter. This command will automatically modify the necessary files to allow you to include Vue.js files in your AstroJS project.
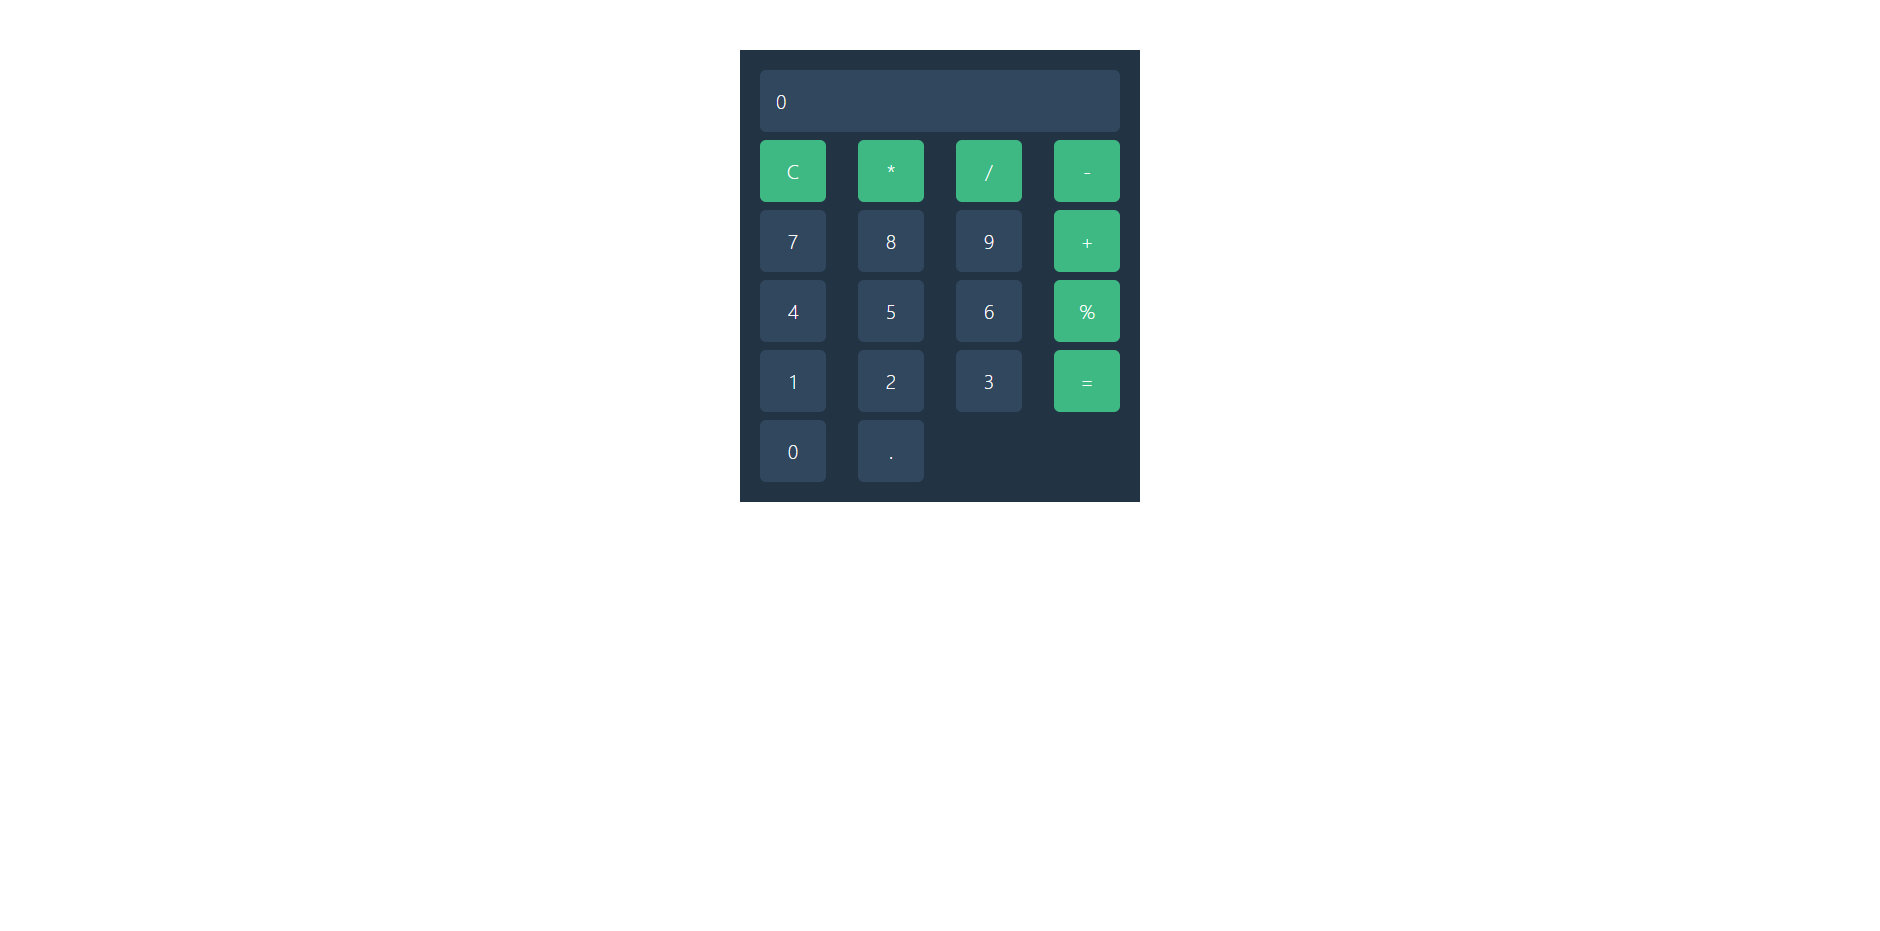
If your local AstroJS server is running, stop it with Ctrl+c and then run the installation.I found a calculator online, and here is its code in Vue.js:
<template><!-- Happy Coding --><div class= "p-3" style= "max-width: 400px; margin: 50px auto; background: #234">
    <!-- Calculator Result -->    <div class= "w-full rounded m-1 p-3 text-right lead font-weight-bold text-white bg-vue-dark">    {{ calculatorValue || 0 }}    </div>
    <!-- Calculator buttons -->    <div class= "row no-gutters">    <div class= "col-3" v-for="n in calculatorElements" :key="n">        <div class= "lead text-white text-center m-1 py-3 bg-vue-dark rounded hover-class"        :class= "{'bg-vue-green': ['C','*','/','-','+','%','='].includes(n)}"        @click="action(n)">        {{ n }}        </div>    </div>    </div></div></template>
<script>
export default {name: 'Calculator',props: {    msg: String},
data() {    return {    calculatorValue: '',    calculatorElements: ['C','*','/','-',7,8,9,'+',4,5,6,'%',1,2,3,'=',0,'.'],    operator: null,    previousCalculatorValue: '',    }},
methods: {    action(n){
    /* Append value */    if(!isNaN(n) || n === '.'){        this.calculatorValue += n + '';    }
    /* Clear value */    if(n === 'C'){        this.calculatorValue = '';    }
    /* Percentage */    if(n === '%'){        this.calculatorValue = this.calculatorValue / 100 + '';    }
    /* Operators */    if(['/','*','-','+'].includes(n)){        this.operator = n;        this.previousCalculatorValue = this.calculatorValue;        this.calculatorValue = '';    }
    /* Calculate result using the eval function */    if(n === '='){        this.calculatorValue = eval(        this.previousCalculatorValue + this.operator + this.calculatorValue        );        this.previousCalculatorValue = '';        this.operator = null;    }    }}}</script>

<style scoped>.bg-vue-dark {    background: #31475e;}.hover-class:hover {    cursor: pointer;    background: #3D5875;}.bg-vue-green {    background: #3fb984;}</style>
I placed this code in a file called Hesap.vue. I also noticed that this code relies on the Bootstrap framework. To resolve this, you can add the Bootstrap 5 CDN link to the head section of the Layout.astro file:
<link rel="stylesheet" href="https://cdn.jsdelivr.net/npm/bootstrap@5.2.3/dist/css/bootstrap.min.css">Next, open the index.astro file and include the Vue.js code like this:
---import Layout from "../layouts/Layout.astro";import Hesap from "../components/Hesap.vue";---<Layout> <Hesap client:load/></Layout>Please note that if you import Vue.js files, you need to include attributes like client:load, client:visible, etc., for it to work.
You can see how it looks in the image below:
React.js
Section titled “React.js”Now, let’s discuss how to integrate the React framework into AstroJS.
First, place your React file in the src/components/ directory. You can either write your own or find one online.
Now, you need to install AstroJS’s React plugin. Open your terminal:
npx astro add react -yEnter the command above and press Enter. This command will automatically modify the necessary files to allow you to include React files in your AstroJS project.
If your local AstroJS server is running, stop it withCtrl+c and then run the installation.
I created a file called BlogPost.jsx in the src/components/ directory with the following code:
import React from 'react';
const BlogPost = ({ title, author, content }) => {    return (    <div className="blog-post">        <h2>{title}</h2>        <p>By: {author}</p>        <div>{content}</div>    </div>    );};
export default BlogPost;Now, open the index.astro file and include the React code like this:
---import Layout from "../layouts/Layout.astro";import BlogPost from "../components/BlogPost";---<Layout> <BlogPost author={"Hamza ORTATEPE"} title={"Bu uygulama react + astro ile oluşturulmuştur."} content={"Sayfa içeriği"} client:load/></Layout>Bu kodda ise oluşturduğumuz bileşenin içine yazı gönderdik. Aşağıda görüntüsü verilmiştir.

Svelte.js
Section titled “Svelte.js”Next, let’s discuss how to integrate the Svelte framework into AstroJS.
First, place your Svelte file in the src/components/ directory. You can either write your own or find one online.
Now, you need to install AstroJS’s Svelte plugin. Open your terminal:
npx astro add svelte -yEnter the command above and press Enter. This command will automatically modify the necessary files to allow you to include Svelte files in your AstroJS project.
If your local AstroJS server is running, stop it withCtrl+c and then run the installation.
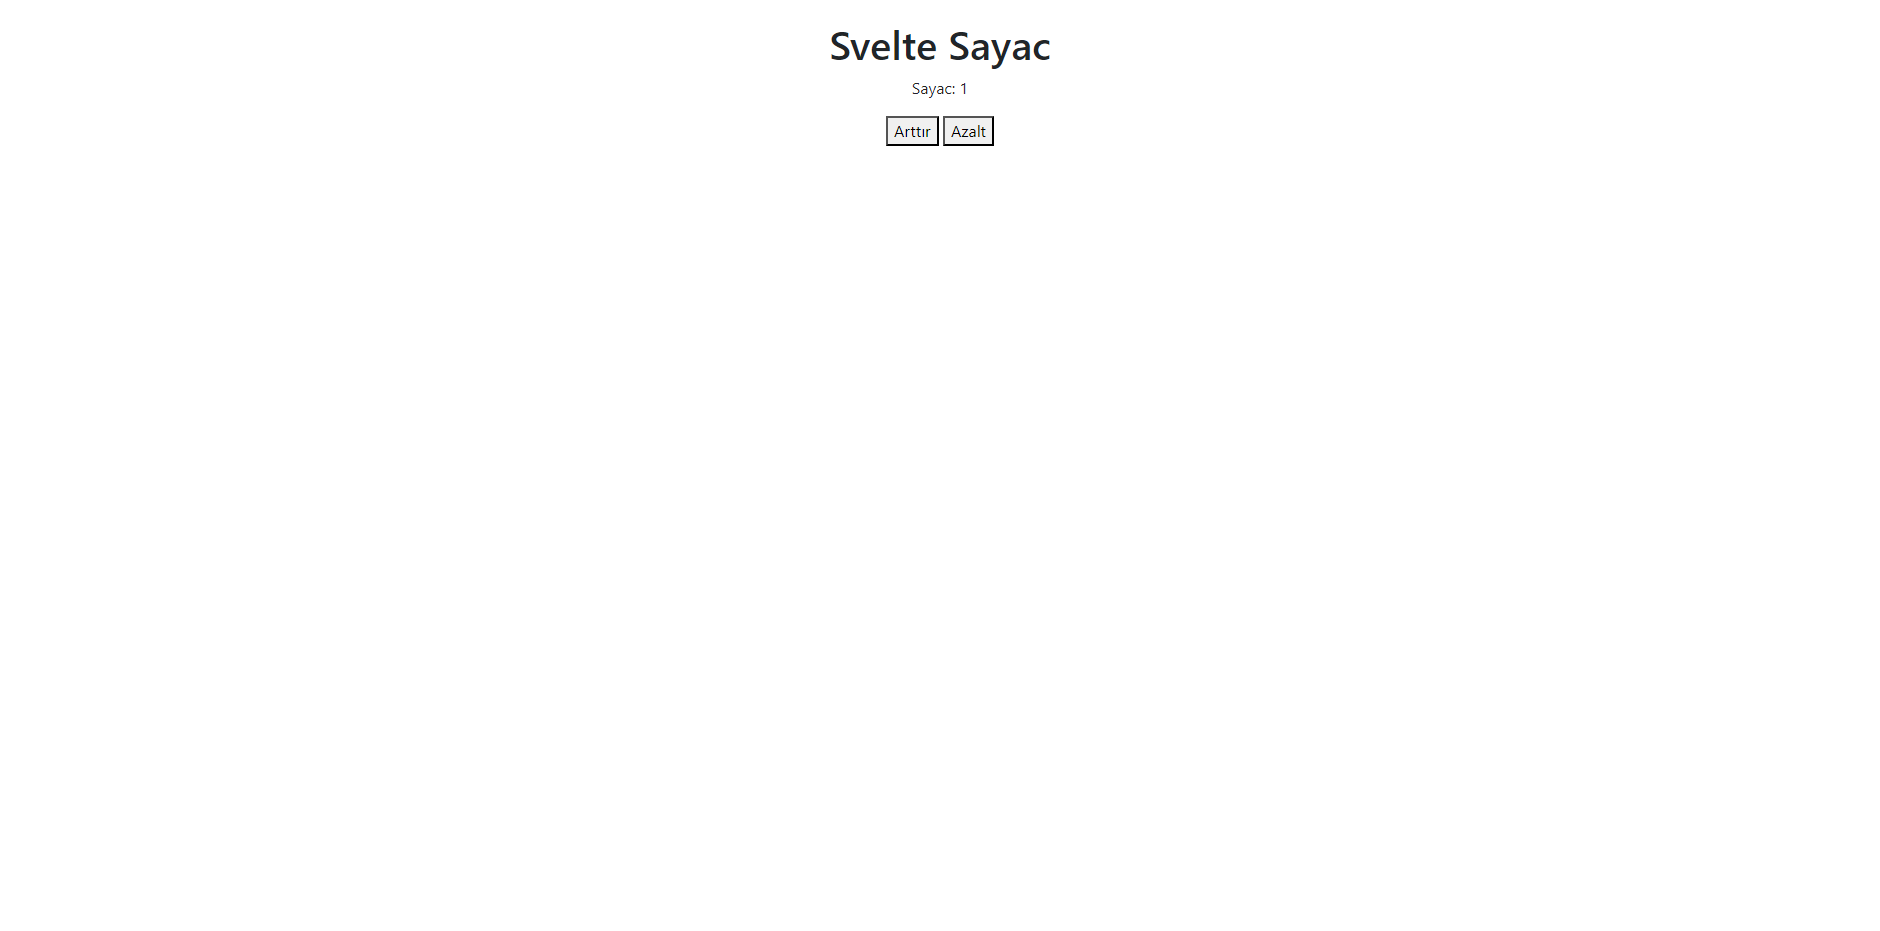
I created a file called Counter.svelte in the src/components/ directory with the following code:
<script>let count = 0;function increment() { count += 1;}function decrement() { count -= 1;}</script><main><h1>Svelte Sayac</h1><p>Sayac: {count}</p><button on:click={increment}>Arttır</button><button on:click={decrement}>Azalt</button></main><style>main { text-align: center; padding: 20px;}</style>Now, open the index.astro file and include the Svelte code like this:
---import Layout from "../layouts/Layout.astro";import Counter from "../components/Counter.svelte";---<Layout> <Counter client:load/></Layout>This code creates a simple counter component. You can see how it looks in the image below:
Alpine.js
Section titled “Alpine.js”Now, let’s discuss how to integrate the Alpine.js framework into AstroJS.
Now we need the alpinejs plugin for astrojs. For this, we open our terminal screen.
npx astro add alpinejs -yWe paste the code and press Enter. This code automatically changes the content of the necessary files, allowing you to insert alpinejs files into astro files.
If your astro file is running on localhost, stop it withCtrl+c and install.
Alpinejs does not have its own extensions like other frameworks. You can use it directly in astro files.
Here’s an example of Alpine.js code:
---import Layout from "../layouts/Layout.astro";---<Layout> <div x-data="{ open: false }"> <button @click="open = true">Genişlet</button> <span x-show="open"> Bu butona bastığın için bu yazı ortaya çıktı </span> </div></Layout>This code creates a simple toggle element using Alpine.js. The output is shown in the images below:


Tailwind CSS
Section titled “Tailwind CSS”Now, let’s discuss how to use the Tailwind CSS framework with AstroJS.
First, install the AstroJS Tailwind CSS plugin. Open your terminal:
npx astro add tailwind -yEnter the command above and press Enter. This command will automatically modify the necessary files to include Tailwind CSS in your AstroJS project.
If your local AstroJS server is running, stop it withCtrl+c and then run the installation.
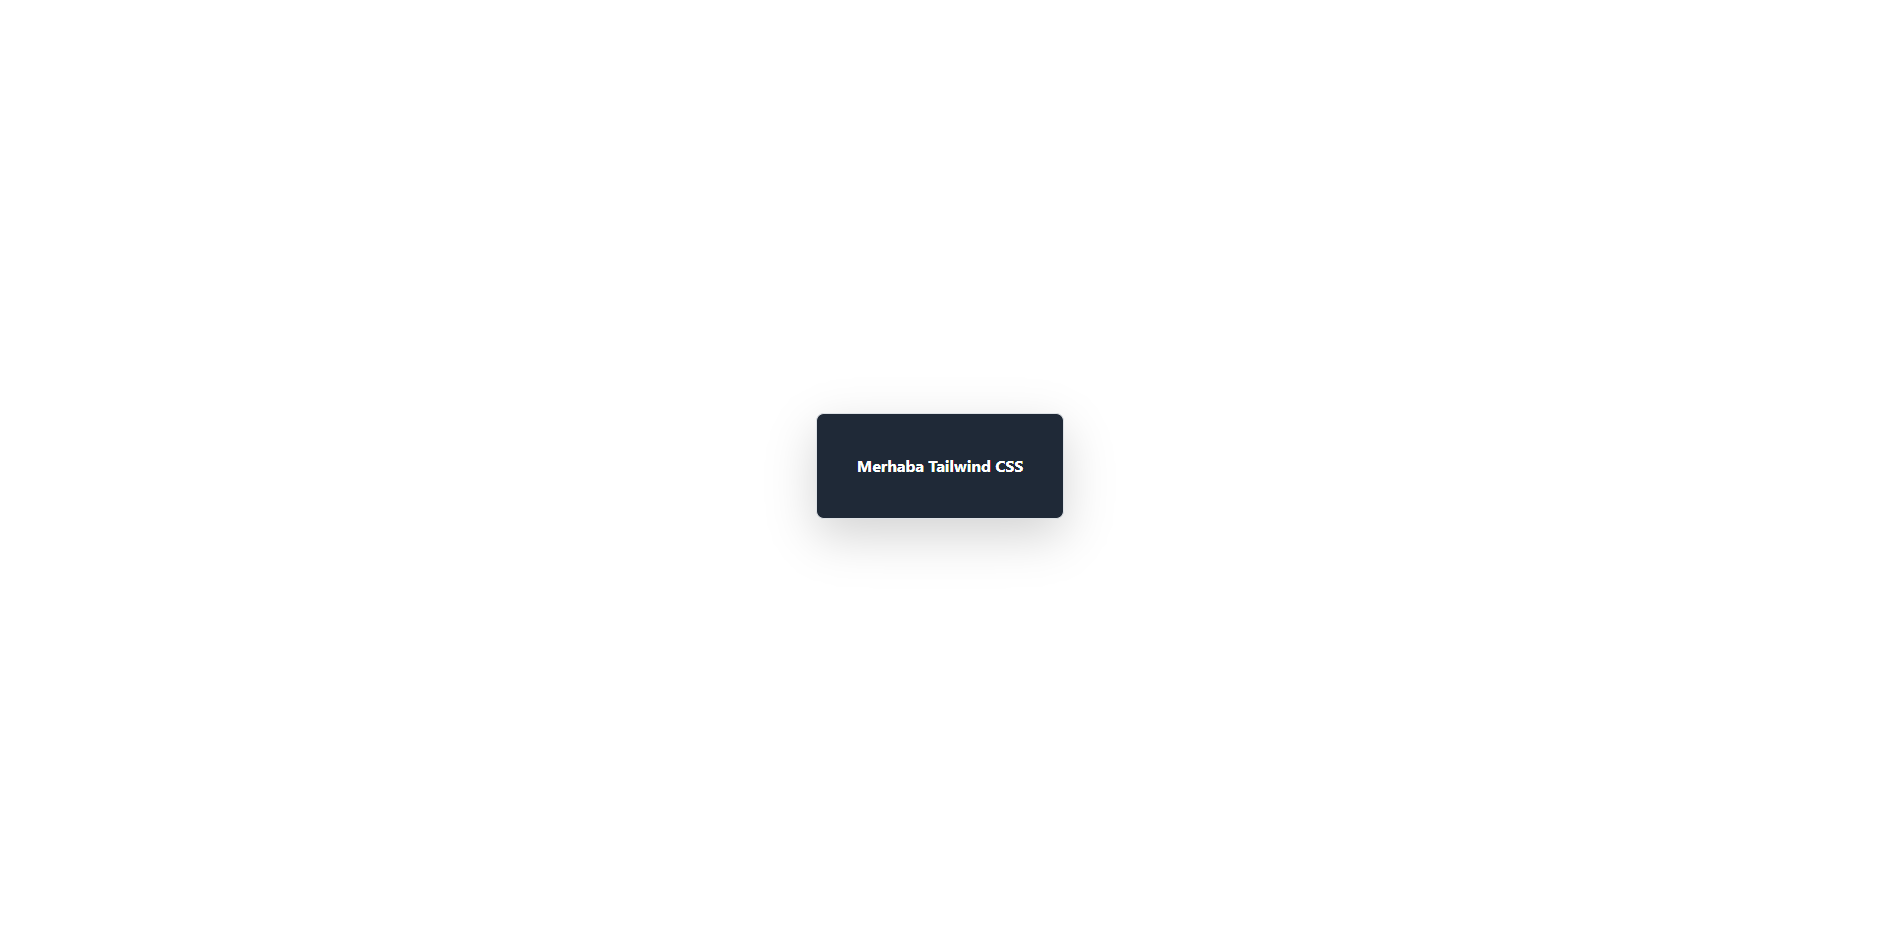
Now, open the index.astro file and include the Tailwind CSS code like this:
---import Layout from "../layouts/Layout.astro";---<Layout> <div class="flex items-center justify-center h-screen"> <div class="bg-gray-800 text-white font-bold rounded-lg border shadow-lg p-10"> Merhaba Tailwind CSS </div> </div></Layout>This code demonstrates a simple use of Tailwind CSS classes. The output is shown in the image below:
Others
Section titled “Others”AstroJS supports several other frameworks, which you can find here.